


Key Steps
1.
2.
3.
4.
5.
Add a timecode
Build up your new project
Extend the animation
Adjust your footage velocity
Final verifications
0 : 24
0 : 47
1 : 51
2 : 51
3 : 51
2.
3.
4.
5.
Build up your new project
Extend the animation
Adjust your footage velocity
Final verifications
0 : 47
1 : 51
2 : 51
3 : 51
Tips and Tricks
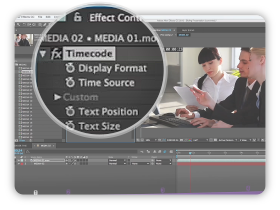
Add A Timecode
The timecode effect allow you to create counter
and timecode or frame-number text overlays.
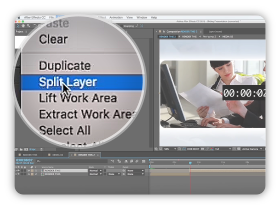
Split Layers
Use Edit > Split Layer to break the
current layer into 2 different layers.
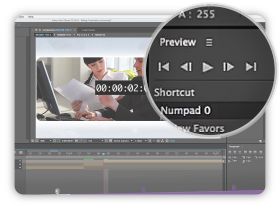
Launch A Ram Preview
Click the Play button in the Preview panel
to play video and audio in the Timeline.
Tutorial Transcript
In this tutorial, we will show you how to extend the duration of a specific placeholder in your project. As an example, we will use the template Sliding Presentation and extend the MEDIA 02 placeholder to 5 seconds, as it is pretty fast in the original project.
First we need to add a Timecode in the MEDIA 02 composition that will help us carrying on the next steps of the tutorial. In the Effect panel, type Timecode and drop it on your media. You can see it on the top of your project. It is pretty small to work with, so increase the Text Size and center it.
Now we have to precompose the RENDER THIS composition. Select it in the Project panel and drag it onto the Create a new Composition button. Before extending the duration of our Media 02, we also need to extend the duration of the whole composition. Go to Composition, Composition Settings… and add 20 seconds.
You have now to find where you want to slow down the animation. Select the frame on which the MEDIA 02 appears. Ideally, you have to see only the media you want to slow down and avoid the frames on which other media appear as well. Here it’s perfect. When you are set, go to Edit, and select Split Layer. This will break our main composition into 2 parts.
Now just do the same at the end of the MEDIA 02. Set the position at the time you want to get back to normal speed, here for example. In Edit, select Split Layer again. As you can see, we have isolated the part we want to slow down, which will allow us to easily work on it.
We will now apply the same method that we used in our previous tutorial « How to slow down the animation ». Check it out for more explanations.
First zoom in a little bit and select the part you want to slow down. Right-click on Time, Time stretch… and increase it by 5 seconds. The stretch factor has automatically been changed to 5100. Keep this number in mind as we will use it later. Slide the 3rd part to fit to the end of the slowed part. Remember to press and hold Shift during this step as it will help you to easily achieve a perfect synchronization.
In the RENDER THIS 2 composition, place the Time indicator at the beginning of the slowed part and note the time displayed by the Timecode.
Now go to the MEDIA 02 composition and find the exact same time. Go to Edit, Split Layer and apply an inverted time stretch on the newly created layer. It will allow you to still display your media at a normal speed. Remember we had a 5100 Stretch factor earlier. So to have the exact opposite, we will divide 100 per 51 and use it as Stretch factor. You are set.
Go back to the RENDER THIS 2 composition and first, check the Timecode to make sure that it is perfectly linear. Put the time indicator at the end of the slowed part and again, note the time displayed by the Timecode. Find the same time in the MEDIA 02 composition. Again click on Edit and Split Layer. We will now return to the normal speed by applying a 100 Time stretch on the newly created layer.
Make sure that all is linear in the RENDER THIS 2 composition using the Timecode. You can also launch a previsualization by pressing on 0 to be sure that everything is ok. When you are finished, don’t forget to turn off the Timecode before rendering the project!
We hope this tutorial will help you to easily customize our projects. Feel free to contact us if you have any questions. Thanks for watching.
Comments are closed.