


Key Steps
1.
2.
3.
4.
5.
Import your logos
Setup a dark Luma Keyer
Setup a bright Luma Keyer
Create a mask
Export your logos
0 : 13
0 : 26
1 : 01
1 : 31
2 : 08
2.
3.
4.
5.
Setup a dark Luma Keyer
Setup a bright Luma Keyer
Create a mask
Export your logos
0 : 26
1 : 01
1 : 31
2 : 08
Tips and Tricks

Transparent Mode
Click on this button to toggle
on or off the transparent mode.
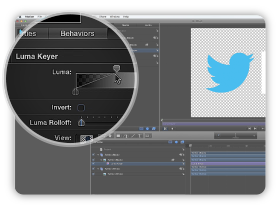
Luma Keyer Effect
The Luma Key filter works by keying out
either bright or dark areas of an image.
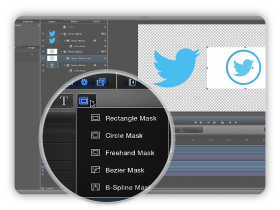
Mask Tools
Choose a mask tool from the menu
to hide portions of a selected layer.
Tutorial Transcript
In this tutorial I will show you how to add transparency to a logo or an image. In most cases, you will have to remove a white or a black background around your logo, and I will show how to proceed. To get started, you have to activate the transparent mode.
On the first case, we will remove the black background on this left logo. Select it and apply a Luma Keyer effect on it. Now it affects the logo. You have to go into Inspector and Filters, then you can adjust the levels using this slider. I recommend to check if the Luma Keyer is accurate using different views : composite is the default view but I suggest to check the Matte view. You can play with the slider and observe how it affects your logo.
Now we will take care of our second example, which is a bit more complex. We want to remove the white area outside the logo, but keep it inside. First select it, apply a Luma Matte on it and remove all the white. If you need to adjust the levels, the white fade is controlled by the right slider. Again, check the Matte Mode to be sure that the Luma Keyer is working correctly. Now we will duplicate this layer and we will add the white area inside the logo. To achieve this, we will use a mask. On the new layer, delete the Luma effect, and apply a mask. You have a multiple choice of masks shapes, you can try them and see which one fits best to your logo. In this example I will use the Freehand Mask to show you how it works. Left click and hold while you define the shape of your mask. Here you go, you have now the white area inside your logo.
To export your logo, you have to Save current frame, and it is by default a PNG format, which is perfect. I recommend to check in the render options that the Color mode is set to Color plus Alpha, which mean it will export the transparency channel. You are ready to go! We hope this tutorial has been useful for you. Feel free to contact us if you have any questions. Thanks for watching!
Comments are closed.