


Key Steps
1.
2.
3.
4.
5.
Render two videos
Build up your new project
Adjust the two parts
Create a fade effect
Produce your final video
0 : 26
1 : 11
2 : 16
2 : 54
3 : 27
2.
3.
4.
5.
Build up your new project
Adjust the two parts
Create a fade effect
Produce your final video
1 : 11
2 : 16
2 : 54
3 : 27
Tips and Tricks
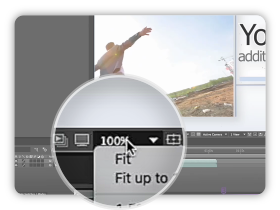
Change Magnification
The Magnification Ratio control in the lower-left
corner of a Composition or Footage panel
shows and controls the current magnification.
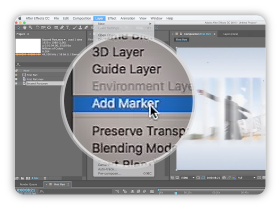
Use Layer Markers
Use composition markers and layer markers
to store comments and other metadata and
mark important times in a composition or layer.
Set Keyframes
Keyframes are used to set parameters
for motion, effects, audio, and many other
properties, usually changing them over time.
Tutorial Transcript
In this tutorial I will show you how to expand the amount of videos displayed using our templates. As an example, we will use the template Clean showcase that contains 6 media placeholders and we will expand it to have 10 media placeholders. To proceed, first we have to render the project twice. Then I will explain you how to assemble your 2 parts to finally render your video.
The first time you use the project, you will render your media 1 to 6 in a video called first part and the second time you use the project, you will render your media 5 to 10 in a video called second part. As you can see, both videos 5 and 6 are used in both renders, which will allow us to assemble them to make a unique video. Please be sure to render with high quality settings, if possible uncompressed, to keep the best quality when we will render again these assets.
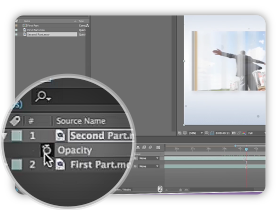
Back to after effects, we have to import your 2 parts in your folder panel and drag the first part on the create a new composition button. Go to composition, composition settings and extend the composition by 1 min. Zoom out and go back into the folder panel, select your second part and drag it above the first part. Find where your media 6 start. By preference, choose a moving frame, not a static one, as frame reference. Go to layer, and add marker. You can notice the marker here. Then find the same frame on the first part. When you are ok, go to layer, and add marker. Now make sure to align the markers. Press t on your keyboard to display tho opacity settings, and set it to 50%. Then zoom in, and displace the second part to fit perfectly to the first part. You can hold the left button and go on the left and right to achieve this, or you can press alt and page up page down to move one frame backward, one frame forward.
When you are ready, set the opacity to 0%, add a keyframe by clicking on the clock, go one second after or less, and set the opacity to 100%. In most of our templates, you will not need to use a fade but on some templates, we have randomized our wigle effect, the result will be better. Now zoom out, and adjust your left and right locators. Go into composition, make movie, select your output module, you location, name and press render.
I hope this tutorial will be useful for you. Feel free to contact me if you have any questions. Thanks for watching.
Comments are closed.