


Tips and Tricks
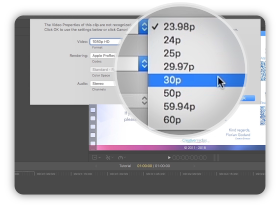
Create your project in 30fps
All our templates are designed
to work in 30fps environment.
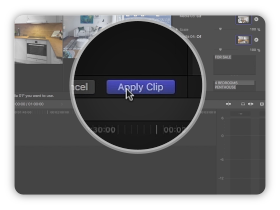
Apply Clip
Once you have selected your footage
click on apply clip button or press Enter.
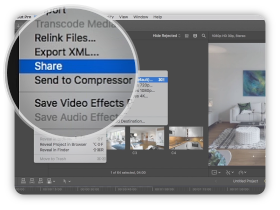
Share your project
In the File menu click on Share and
select Master File, then adjust settings.
Tutorial Transcript
Hello, I am Florian Godard from CreativeMedias. In this tutorial I will show you how to edit my templates with Final Cut Pro X.
Open Final Cut Pro X and start with a new project. Click on the Generators sidebar icon, open the Generators dropdown menu and search for your templates. If you copy past the templates files, they should be placed in the custom folder. Click and drag the template in the timeline. Choose 30 frames per second and click ok.
You can find on the right part of the screen the published parameters that will allow you to customise your video.
Let’s start by unchecking the instruction notes and advance in the timeline to have an overview of your template. Then stop on a frame that display many footage.
To import your footage, go back in the library sidebar and click on a project. Then select and import your files.
Click on the template and go back in the published parameters. We will start to replace the Media placeholders with your footage. Click on Media 01 placeholder and select your footage. Repeat the operation with Media 02, 03 and 04. Once you have finished click on Apply Clip. If the Apply Clip button is missing, you can press the Enter Key.
As you can see, the animation is now updated with your footage.
To edit your texts, click on the generator and go back to the published parameters. You will see multiple text zones. You can edit your texts and it will instantly update the animation.
Now, let’s add your logo. Select source clip and click on your logo, then apply clip. As you can see the logo needs adjustments. Below the logo placeholder, you will find pan or position controls and a scale slider. You can modify these parameters to adjust your logo.
Finally, most of templates include color customisation options. Click on a color parameter, this will open the color palette selection tool. Then when you pick a different color you can instantly view the result.
When you have finished to edit your animation, here is how to export your video. In the File menu, click on Share and select Master File. In the Setting panel, be sure to select Video and Audio. I recommend to use a H264 Codec. Click on Next, edit your file name and change folder if needed. You can check the export progression in the Background Tasks panel.
I hope this tutorial has been helpful for you, thank you for watching!
Comments are closed.